XML, Transcripts & Clip Management

Import XML, Link or Order Transcripts, and Manage Clips

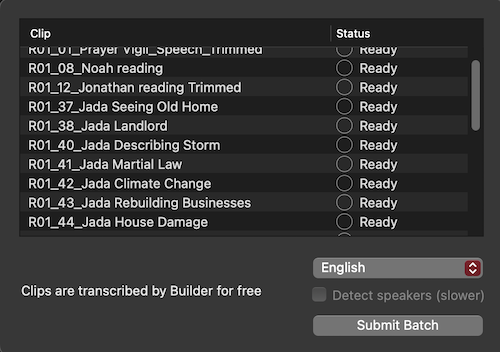
After organizing and preparing Clips, Multicam Clips, or Synchronized Clips in Final Cut Pro or Premiere Pro export Event or Bin XML. Import that XML to Builder. After import any Clips without transcripts will be automatically added to a Transcription Batch waiting approval of language selection ready to transcribe free.

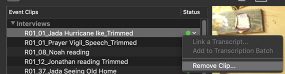
You can remove a Clip, add new Clips (or replace removed Clips) by importing an updated XML and Export Transcripts.

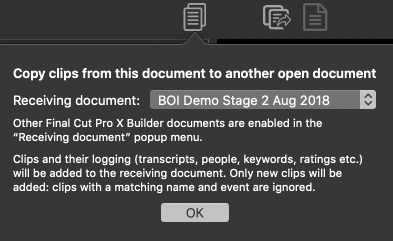
Builder can also update a document with from a newer Builder document and transfer transcripts and Keywords to the master document.

Import XML

Import the XML you have exported from your Video Editor, by clicking on the Import XML button. After the initial import, the button will change name to match the type of XML first imported. Builder supports either Event XML from Final Cut Pro, orBin XML from Premiere Pro. Once set the type of XML cannot be changed in that Builder document.

Final Cut Pro X users can also drag one or more Events from Final Cut Pro X directly to the Clip list in the Builder interface.

Getting Transcripts

When an XML is imported any Clips without transcripts will be automatically added to the transcription batch and the Transcription Batch window opens. Select language and Submit the Batch.

If the Transcription Batch Window does not open automatically, click on the Transcription Window Button to open it.


You might be interested to know that we break the text into sentences because:

  • shorter sound bites are more useful to work with
  • it is faster in Builder to join together two (or more) sentences than to split a text range into sentences.
  • Shorter sentences are better for Closed Captions.
Export Transcripts from Builder

You can export Transcripts ordered (and corrected) in Builder to a Text file with time stamps. If the original media has Timecode, the exported time stamps will match the media Timecode.

Export Edited Transcripts and Keywords to the Video Editor

When you export a Story to the NLE, the Bin or Event information is automatically updated with the Transcript and Keyword information from Builder NLE.

Note: For Final Cut Pro X, select "Replace" in the import options.

In Final Cut Pro X the transcript will appear in the Notes field of the Keyword Range.

In Premiere Pro the transcript will appear in the Notes field of the Marker Range.

Remove Clip (Replace Clip, Replace Transcript)

In order to replace a clip (with an updated version from FCP X), or to simply remove a Clip from the Builder Project, click on the orange/green button at the right of the Clip and select Remove Clip.

The Clip will be removed from the Builder Project. If this is the last Clip in a Final Cut Pro X Event or Premiere Pro Bin, inside Builder, the Event header will also be removed.

Replace Clip

After removing the clip you want to update, import an updated XML for that FCP X Event or Premiere Pro Bin. Only Clips currently not in the Builder Project will be added.

Replace Transcript

After removing the clip you want to update, import the original (unchanged or updated) XML for that FCP X Event or PP Bin. Only Clips currently not in the Builder Project will be added.

The Clip(s) will automatically be added to a Transcription Batch (or follow the process in the Accordion below to link an existing transcript).

Important: There's only one problem with the new Delete Clip function in Builder. It will lose any keywords applied to that clip's text ranges. The keywords remain and will autocomplete in the Keyword entry box, and be visible in the Keyword Manager.

Retain Keywords when Deleting a Clip

If you want to retain those keyword ranges, first Export Clips to send the logged Ranges to the FCP X Event or Premiere Pro Bin they came from.

When you're ready to add the Clip back to Builder (perhaps with an updated transcript) then export new Event XML from FCP X or Bin XML from PP. When update the transcript the keyword ranges from FCP X (that originated in Builder) will be applied to the new Clip/Transcript combination.

Update Builder Documents

Projects evolve and it is not unusual to have additional material to add to a work in progress, or to send an updated document to a producer working on story edits. This form of collaboration is fully supported in Builder.

Builder NLE fully supports updating a Builder document in two ways:

  • Import XML with additional Clips,
  • Update one Builder document from another (newer) Builder Document.te with Additional Clips.

To update a Builder document with additional Clips, export an updated XML with both the original, and additional, Clips.

Builder will add only the additional Clips, without duplicating any already in the document.

Update from one Builder Document to another Builder Document

It is also possible to update a Builder Document from another Builder document.  For example, a producer or story writer may have started work keywording and organizing the Builder document. When new materials come in they don't want to start over.

Instead, create a new Builder document (or update a copy) and import the new media (or update the Builder document).

Click on the Copy Clips button and choose the Builder document to be updated.

Clips, with their logging and transcripts will be added, with no duplication, to the receiving document.

Legacy Features

Until Builder 4 and later (Dec 2022) transcripts had to be provided to Builder, or ordered through a third party Speech-to-text service. Now that Builder supports unlimited free transcription there is little reason to use these legacy features.

You may wish to use them if you need a language not supported by the built-in transcription, or if you have exported Transcripts for editing outside Builder.

Link Transcripts to Clips (Legacy)

If you need to link to timed transcripts from outside Builder, cancel the Batch Transcript window without submitting the Batch.

As long as there is no existing transcript connected the clip, to link transcripts to your clips, select the pull-down menu item next to the clip name and select "Link to Transcript" (to add a transcript). Match the first Clip to the matching transcript name. (Clip name not media file name.) Clip name can be an AV clip, audio only, Synchronized Clip or Multicam Clip. Builder will find any other transcripts that match clip names, and link to them. If the names do not match, you can still add transcripts one-by-one to each Clip in turn.

Important: Make sure your transcript formatting is correct for Builder. There should be no header or title in the transcript itself. For details on supported formats see Builder Transcript Formats.

If you accidentally link the wrong transcript to a Clip, or need to update a transcript already linked to a Clip, Remove the Clip, Re-import the XML containing the Clip, and link to the correct or updated transcript.

Note: Time stamps in transcripts are used to align the transcript to the clips. We break the transcript into text blocks during import. These text blocks better match the way people add sound bites to a Story.

Builder originally did create text ranges from transcript documents with text range breaks, and it was demoed that way in the early days. But those early demos spent a lot of time breaking down text ranges, and it became obvious that there should be a better way.

There are three reasons why it was changed to breaking on sentences:

  • shorter sound bites are more useful to work with
  • it is faster in Builder to join together two (or more) sentences than to split a text range into sentences
  • there are no text range breaks in transcripts from SRT  data.
Order Transcripts in Builder (Legacy)

Since version 4 (December 2022) Builder supports unlimited free transcriptions. If you need a language not supported for free transcriptions, you can still use the legacy speech-to-text transcription at 25c per minute.


To order transcripts that way, cancel any automatic Transcription Batch and navigate to Builder Preferences/Settings . In the Transcriptions Tab, select "Upload to a speech-to-text server for transcription at 25c per minute."

Return to the Transcription Batch window, make your language selection and submit the batch.

If the Clip has not been added to the Batch automatically,  click on the pull down menu beside the clip name and select “Add to Transcription Batch.” Once added to a batch, the indicator color changes to yellow until the transcription is ready. You can remove a Clip from a Batch by using the same menu item, which will have changed to "Remove from Transcription Batch."

Transcriptions ordered from within Builder will be charged to the credit card on file at 35c per minute. You will only be charged for the minutes in each transcription batch. The credit card charge will show Lumberjack Transcript and the Builder Project name so you can more easily apportion costs to each project.

If you accidentally add a clip to a transcription batch by mistake, you can remove it from the batch from the same menu.

You can add multiple clips that will be processed in one batch.

When you’ve added all the clips for this batch, click on the Batch button to open the batch manager.

You’ll see the clip names and status in the main interface.
At the bottom of the window you’ll see the total duration for the batch, and how much you’ll be charged. We charge only the amount required for each batch to the card on file at Stripe. You can change that card by following the link from Builder’s Preferences.

Choose the language from the pop-up menu. The different English options affect the spelling g in the transcript.

When you’re ready, click Submit to start the process.

IMPORTANT: Do not close the Builder document or quit the app while files are uploading. Doing so will stop the batch uploading and can lead to duplicate transcription charges.

If you have mixed languages to process, create a batch for each language.

Every item in the batch is handled in parallel, so it takes very little time to get the transcripts back. Any batch will only take as long as the longest clip’s processing time.

When the transcript is complete the indicator will turn green and the transcript will be available, aligned to your clips.

The entire process is usually way faster than real time.